Windows 10 has moved into Linux territory with the immensely popular WSL (Windows Subsystem for Linux). With the latest introduction of WSL2, which is the updated version of WSL, users can now utilize an actual Linux kernel for the execution of Linux tasks from Windows. Now, with the rollout of the latest Windows update codename 20H1, WSL2 is set for its official release. So, let’s take a look at how you can install Windows Subsystem for Linux on Windows 10.
First of all, if you want to learn about the Windows Subsystem for Linux in Windows 10, our introductory article onWhat is WSL and WSL2? – Linux in Windowswill surely help you out. Do check that out if you want to learn the basics in a jiffy.

In a nutshell, WSL2 or Windows Subsystem For Linux version 2 provides the users with aLightweight Linuxconsole environmentwithin the Windows 10 Operating System. So, you will be able to run Linux binaries from Windows 10 without the use of Virtual machines. Furthermore, the Windows Subsystem for Linux in Windows 10 can be used for corecommand-line toolsand services. But most importantly, thebash shell.
In this Windows 10 WSL tutorial, we’ll show you how to install the Windows Subsystem for Linux in two methods.

Also, we’ll show you how you can install the different Linux distros available in the Microsoft store. But, the installation of Linux distros like Ubuntu on Windows 10 requires that you have installed WSL first.
How to Install Windows Subsystem For Linux on Windows 10 (Graphical Method)?
Requirements:
Installing WSL using the Settings app and Control Panel would be the method of choice for most users, as that is the easiest. Here are the steps to Install WSL in Windows 10:
Alternatively, you can open up theSettingsapp on Windows 10 and then navigate toApps > Programs and Features > Turn Windows features on or off.
How to Install Windows Subsystem for Linux using Windows 10 Powershell?
If you’re into Linux, it probably means that the command line is your best friend. For such folks, typing stuff out on the command line is more fun and satisfying.
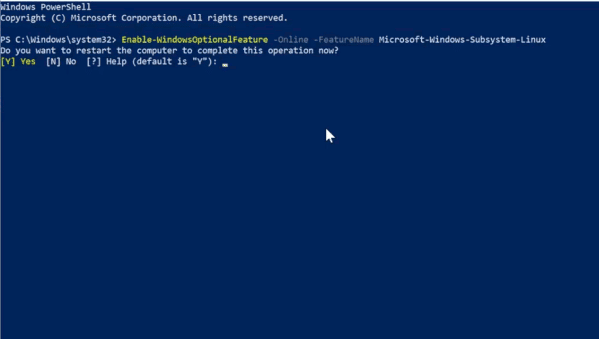
Other than the graphical method of installing WSL2, we can also use the PowerShell to enable WSL in Windows 10. To install WSL using the Powershell, follow these steps:
Enable-WindowsOptionalFeature -Online -FeatureName Microsoft-Windows-Subsystem-Linux
That’s it. After the restart, you now have a working Windows Subsystem for Linux set for some action.

How to Install Linux Distros on Windows 10?
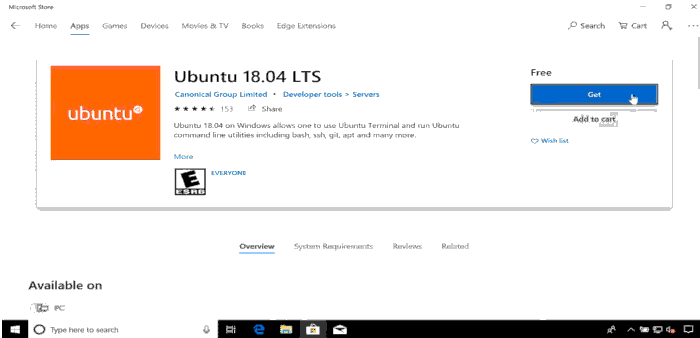
Finally, after installing the Windows Subsystem for Linux, we can now proceed to the installation of the Linux distributions available in the Windows store.
To install the Linux Distro, you want in Windows 10,
(Now, if you haven’t already signed in with your Microsoft account, it will ask you to do so. But, you can also close the pop-up window in case you don’t want to sign in to your account at the moment.)
So now, wait a few seconds before the download and installation process finishes, and you’ll have your Linux distribution installed on Windows 10 and ready for use. Furthermore, the distro will be available directly in thestart menuitself in the form of a standard everyday application.
When starting the Linux Distribution for the first time, a brief setup process will take place. Basically, it will ask for the username and password you want to set for the Linux environment.
Install WSL2: How to Change WSL to WSL2?
After you have successfully installed your Linux distribution along with the WSL feature, you must change Windows Subsystem for the Linux version of your Linux Distro to WSL2. Until you manually change the version, it will remain to run in the WSL environment.
So, to set a Linux distribution to the WSL2 version,
Make sure that you replace the codespace “” with the actual name of the installed distribution.
wsl –set-default-version 2
How to Uninstall Linux Distro in Windows 10?
Furthermore, if you want to make the traditional distro jumps here, things stay easy. You can uninstall and reinstall Linux on Windows 10 using the following steps:
The Linux distribution has now been entirely removed from your Windows 10 machine.
How to Uninstall or Disable Windows Subsystem for Linux on Windows 10?
Maybe for some reason, you are unimpressed or instead prefer to disable WSL2 for Windows 10, uninstalling or disabling WSL on Windows is as simple of a task as the installation process. To uninstall WSL on windows 10, follow the steps below.
Uninstall or disable WSL in Windows 10 using PowerShell
Additionally, just like the installation process, Powershell can be used to uninstall and disable the WSL2 feature on your Windows 10 machine. To do this,
Disable-WindowsOptionalFeature -Online -FeatureName Microsoft-Windows-Subsystem-Linux
Now, you have successfully disabled the Windows Subsystem for Linux on your device.
